- Create a CSR (link). I used a Debian machine for this, you may want to use a Windows port of OpenSSL.
openssl req -out mypc.csr -new ↩
-newkey rsa:4096 -nodes -keyout mypc.key
OpenSSL command in Windows commandline to generate CSR
- Get the certificate by submitting the CSR to StartSSL and save as mypc.crt.
-

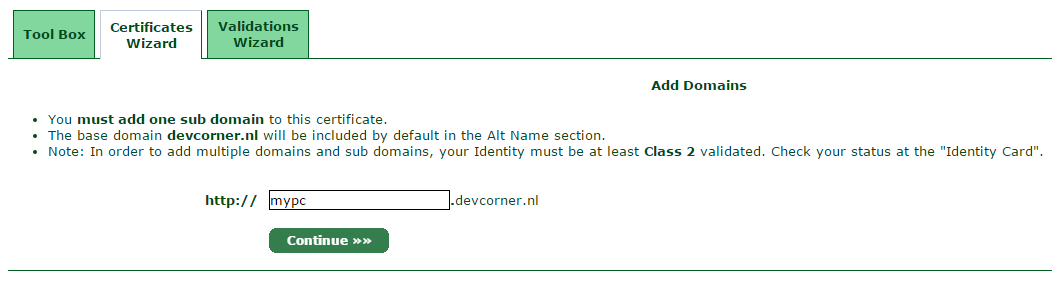
Start the certificate wizard, select Webserver SSL certificate -

Skip the private key generation, another two wizards screens can be skipped / ok'ed. -
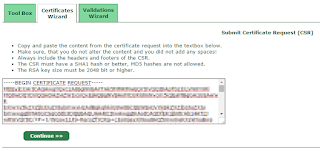
Paste the CSR contents -

Enter the hostname
-
- If all went well (and you clicked OK / next / whatever) a few times you should be presented with a textbox with gibberish; this is your certificate (.crt) copy the text (make sure you select the entire contents of the textbox). Open notepad, paste the certificate, save as mypc.crt.
- Now we'll create a PFX (link) file. You will want to include the StartSSL intermediate certificate (« right-click the link, select 'save as...') in the chain; save it in the same directory as where your mypc.crt and mypc.csr are stored. Then execute the following commands:
type mypc.crt > all.pem
echo. >> all.pem
type sub.class1.server.sha2.ca.pem >> all.pem
openssl pkcs12 -export -out mypc.pfx ↩
-inkey mypc.key -in all.pem
The first three lines create an "all.pem" file by first copying mypc.crt, then a newline and then adding StartCom's intermediate certificate to all.pem.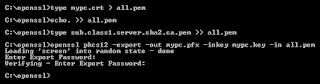
Create PFX file
- Start the management console (WinKey + R then type mmc.exe and hit enter) and add the certificate snap-in (File menu » Add Remove Snap-in). Make sure you pick Computer Account and Local Computer when adding.
- Under Certificates (Local computer) select Personal » Certificates. Right-click the certificates node, choose All tasks and then click Import. Select the PFX file you created in step 3.

Import PFX to personal certificates - Copy the freshly imported certificate (highlight it, hit CTRL + C) and open the Remote Desktop » Certificates node. Paste the certificate in the right-hand pane.
- Double-click the certificate and navigate to the Details tab. Scroll down until you find the Thumbprint; click it and select the value that contains a bunch of hexadecimal numbers (displayed in groups of 2 hex digits). Select and copy the thumbprint.

Select and copy the thumbprint (25 93 ... 81 69 in this example) - Open notepad or any other texteditor, paste the thumbprint and remove all spaces. Also make sure you check the first character; it may contain an invisible value or display as ? or other strange character (depending on the editor). Make sure the end result is a 40 letters (a-f) and/or digits string.
- Open a command prompt as Administrator and paste the following command:
wmic /namespace:\\root\cimv2\TerminalServices ↩
Make sure you replace the "<thumbprinthere>" value with the actual thumbprint (keep the quotes in the command). With the example from step 8 the command would be:
PATH Win32_TSGeneralSetting Set ↩
SSLCertificateSHA1Hash="<thumbprinthere>"wmic /namespace:\\root\cimv2\TerminalServices ↩
PATH Win32_TSGeneralSetting Set ↩
SSLCertificateSHA1Hash="2593dc137c…2ee58a8169"


|
| Add certificate snap-in |


 |
| The endresult. All that hard work for such a small padlock... |
References I used while figuring this out:
http://serverfault.com/questions/566503/using-ca-certificate-for-remote-desktop-connection
http://serverfault.com/questions/257554/ssl-certificate-installation-issue-with-remote-desktop-connection
http://serverfault.com/questions/473484/windows-server-2012-remote-desktop-session-ssl-certificate
http://serverfault.com/questions/444286/configure-custom-ssl-certificate-for-rdp-on-windows-server-2012-in-remote-admini
https://social.technet.microsoft.com/Forums/windowsserver/en-US/53571c0e-22c0-41e9-88d6-5bc8f01f5017/assign-certificate-to-rd-session-host-role-in-windows-server-2012?forum=winserverTS
https://www.youtube.com/watch?v=_YhHuTiCciQ
https://support.microsoft.com/en-us/kb/2001849
No comments:
Post a Comment